I have a specific task I need to do: I need to view a DV stream captured from an NTSC video source via DV bridge and capture screenshots. Since there is a lot of footage, I need to be able to seek easily through the stream (not unreasonable since DV is purely intra-coded, i.e., it consists of independently coded keyframes). Since this is television source material, I want the data competently deinterlaced while viewing and certainly when the screenshots are taken. One more thing — I want the screenshots to retain their 720×480 resolution that looks correct on a computer monitor, and not be squished down to 640×480, overscan region and all.
If you must know, it’s because I play lots of games for my Gaming Pathology project and contribute data for them — including screenshots — to the MobyGames database for posterity. I have a huge number of console games yet to cover and the screenshot dilemma is one thing that is holding me up. Consider the need to properly preserve representative screenshots of the Sega Saturn version of Space Jam for future generations of video game historians to study.

I didn’t think this would be such a tall order. Apple’s iMovie, which comes with my Mac Mini, performs admirably, all the way up to that final requirement where it insists on squeezing screenshots horizontally to 640 pixels across. I just can’t override that behavior.
Next, I tried VLC, the awesome, free, open source, cross-platform multimedia player. While I love using VLC for general playback on most non-QuickTime video files, I have never been a fan of using it for screen capture, functionality which was obviously an afterthought (difficult to configure and use, and hard to tell if it’s really working). However, VLC can play DV and can capture non-squished screenshots. One problem: VLC can not de-interlace DV. Go on, try it, on any platform. Play a DV file and then select a de-interlace mode. VLC will stop playing the video. So close.
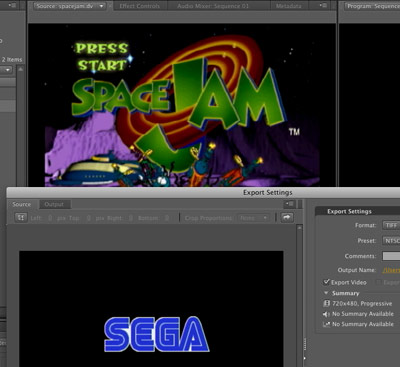
Then I remembered that my own company has a product or 2 dealing with video. So next is Adobe Premiere Pro CS4. I’m pleased to report that it actually meets all of my requirements, although it inadvertently raises a new requirement– the process must use a more streamlined workflow. After loading a DV stream, the screen capture workflow with Premiere Pro works something like this:
- Select File | Export | Media… from the menus
- You are presented with a dialog that allows you to seek through the DV stream; find a frame to capture
- Select a path and unique filename for the capture and press OK
Repeat that same process for each screenshot, starting with the file menu. Don’t make the mistake I first did of scrubbing through the video in the main editor, then invoking the export media dialog thinking that it would export the frame you were sitting on in the main editor– I probably captured about 20 screenshots that way before I found out the stream in the dialog is independent of the position of the stream in the main editor and that I managed to capture 20 copies of the first frame. For you see, there is no immediate feedback– once you press OK on the export media dialog, the export job is actually sent to a queue in Adobe Media Encoder CS4. I let the jobs in the queue sit for awhile before I became suspicious that I was actually just capturing the first frame each time.

click for larger screenshot
Officially, I am prohibited from saying anything negative about this particular product. But there’s really no need to say anything negative about it or any other product on this survey– I fully accept that these are video processing programs that simply aren’t designed to perform my specific task with my very specific parameters. Readers know that this isn’t the first time I have been in this situation (but I really hope I don’t need to resort to writing a custom solution for this task).
I know there are probably plenty more Mac programs I could try out for anywhere from $30-$500 each. But just yesterday, I caught the article Top 10 Free Video Editors for Ubuntu Linux linked from Digg’s Linux page. Maybe I’ll hit paydirt with one of these. The comments in the related Digg post chastised the title of the article for claiming that these editors were for “Ubuntu Linux”, and rightly so– many of the editors listed are not even in Ubuntu’s repository. But I’ll look at some of the ones that are and try to make some others run by downloading them and perhaps compiling them.
First up is Avidemux 2.4.3 (packaged by Ubuntu). It doesn’t go well. The program claims that my DV file looks like MPEG and asks if I would like to index it. If I accept, then the program eventually crashes after giving its best try at indexing; if I decline, the program fails to open the DV file.
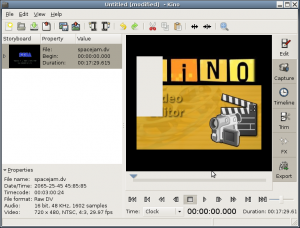
Let’s try Kino 1.3.0 (packaged by Ubuntu). I remember Kino from the days when I was all-Linux all the time and had some DV capturing and processing I wanted to try. Unfortunately, I can’t really get it to do anything useful, even after I read the tutorials and documentation. Kino just sort of stares at me like it wants to do something:
I can load a video clip into the storyboard but I can’t play anything. Well, I can hit the play button and the timecode advances, but nothing gets played. Actually, turning up the volume reveals that audio is being played. But no video is being displayed. As you can see from the white block, the video region is not being repainted. I tried to download and compile the latest version (1.3.3) but met with little luck during the configuration phase.
Next up is LiVES which is not packaged in Ubuntu, but whose website nonetheless has a link to a fairly friendly install mechanism for Ubuntu (covering LiVES 0.9.9.4, where 0.9.9.6 is the latest). This works and LiVES runs.
First impression: What horrifying GUI toolkit is this thing running on top of? So I go to load my modest 3 GB file — not very large in the grand scheme of video processing — only to be met with the warning “LiVES is not currently optimised for larger file sizes.” I m advised to proceed with caution if opening a file larger than 2 GB. Why? Does it seek through a file index using a linear search? Look, large files are pretty much the norm for video editing. I press on anyway and instruct LiVES to load the file. LiVES doesn’t believe the DV file is a valid video or image file.
Next is CinePaint. Based on the description from the article as well as the project’s homepage, I can’t really see how this pertains to video. It seems to be an image editing application. But I figure that perhaps it is capable of loading and scrubbing through videos in order to touch up and maybe even export individual frames. I’ll never know. It’s not in Ubuntu’s repository and I can’t get the source code to compile. Searching for ‘dv’ or ‘ffmpeg’ in the project’s configure script yields nothing, nor do any filenames contain ‘dv’. It is unlikely that the project can work with DV.
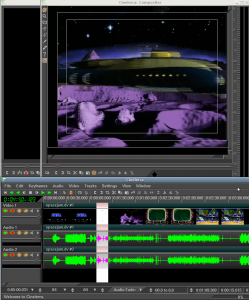
Next I come to Cinelerra. I remember its creators, Heroine Warriors, from when I was just getting started with multimedia hacking back in 2000. Fortunately, the Cinelerra website provides very streamlined ways for getting the program installed on your system. When I first run the program, it strikes me as the GIMP of video editors– lots of individual windows splattered across the desktop (and each with its own entry in the taskbar). An interesting thing about Heroine Virtual’s various programs is that they apparently use their own homegrown UI toolkit. They have been doing this for a very long time and I distinctly recall that back in 2000, their UI widgets were notably more useful than GTK. These days, those same widgets are looking a bit dated.
However, the program installs, runs, and can play back DV. As you can see, it can not de-interlace on the fly. It has a de-interlace filter than can be applied when rendering, though. Plus, I can’t find any screenshot facility.
Vivia looked promising, but I couldn’t make it compile. It’s just as well; closer reading of the download page revealed the rather brazen message, “!!!! Currently only works with PAL DV-format video !!!!”. I wanted to give Jahshaka a try but couldn’t get it to compile nor install through its binary (RPM-based) installer. Finally, I installed Kdenlive from the Ubuntu repository in my Kubuntu VMware session. The program crashed on startup.
The last item on the list of top 10 free video editors is none other than FFmpeg. I know in advance that it doesn’t fit my requirements for this particular task.
Alternate Solutions:
What about transcoding the DV stream to another format, performing the de-interlacing at that stage and then scrubbing through that to find screenshots? That could probably work. But why should I have to?
There is also the possibility of taking screenshots using a facility outside of a video player or editor. Mac OS X doesn’t have very good support for doing this, only hotkeys for capturing the entire desktop or a portion that the user specifies with the mouse; the latter is not an acceptable workflow for taking lots of screenshots. I use Hypersnap for capturing all kinds of screenshots in Windows games. It’s very versatile and I know it would let me capture just the video frame in a media player… if only I knew of a Windows player that could freely seek through and play back DV while de-interlacing and without deforming the video in any way.
What about my original brainstorm- play back the DV file in any number of de-interlace-capable video players and press a hotkey for capturing screenshots? As mentioned, VLC can’t handle this. QuickTime Player really likes DV but insists on squeezing them horizontally on playback.
How about the first multimedia program I ever hacked on — MPlayer. I installed it from the Ubuntu repository and it can’t seem to handle the DV stream. Strange. It seemed to be doing something with my CPU, just not showing me any video (or playing any audio). I tried some other, much more obscure file types (that I always have handy) and they looked fine. Then I played another, short, testing DV clip that I made and it worked. Using the -vf screenshot option, I was even able to capture screenshots in realtime (they were 720×528 but looked okay). But that doesn’t do me much good if I can’t use it on certain clips I have that are an hour long. MPlayer also doesn’t provide very fine-grained seeking controls. Fortunately, SMPlayer solves that problem. But not if MPlayer can’t play the longer clip.
I tried Totem which was able to play the audio but couldn’t render the video, same as Kino. I don’t know what backend it was using.
In Conclusion
Don’t think that this exercise was a total loss. I finally had an opportunity to survey a wide variety of end-user open source software programs that rely on FFmpeg, something I have been resolving to do for some time now. And I even found a few that aren’t mentioned on the master list yet.
I am still without an adequate solution. But I’m sure you have some ideas. Let’s hear ’em. I still have at least 40 games from various consoles that I need to play and capture. For sport, I sliced up a 40 MB portion of the DV stream in question and made it available for download. Apple’s QuickTime Player can play it, so I assume it’s minimally valid. However, chopping the stream confuses VLC enough that it can’t handle it.


It seems Kino uses FFmpeg directly: http://www.kinodv.org/article/static/3
Totem, as far as I recall, can use a few different backends. I would suspect it was using either GStreamer of xine. If running on Ubuntu or similar, try installing the gstreamer0.10-plugins-bad gstreamer0.10-plugins-bad-multiverse gstreamer0.10-plugins-ugly gstreamer0.10-plugins-ugly-multiverse packages. Maybe one of those has something to do with dv in it.
There’s a program called pitivi that’s written by GStreamer devs so maybe try that after you’ve installed the above.
On windows, if you install http://ffdshow-tryout.sourceforge.net/ I expect that can play DV. Then it’s just a case of finding a suitable program. Media Player Classic or VirtualDub may be of use. The Home Cinema version of Media Player Classic is more up to date I think ( http://mpc-hc.sourceforge.net/ ).
Also note that there is a key combo you can use to capture the current window in OS X. Shift-Command-4 and then press space and click on the window you want. You’d have the Quicktime window borders but you can probably script cropping them off if your videos are always the same resolution.
Good luck!
That sample is not going to work, FFmpeg and MPlayer do not support DV files cut out of random portions, this causes far too many false positives (Quicktime has less of an issue since it supports far fewer formats in practice, and probably relies on the extension – it may just be lacking functionality as well, maybe ffmpeg-devel is a good place to ask).
Anyway, for your sample file, after
dd if=spacejam-title.40MB.dv of=fixed.dv bs=16 skip=3480
it plays just fine in MPlayer.
To find the right place to cut, look for the bytes 1f 07, followed by 6 “random” bytes and then lots of ff.
I added support for finding such valid start offsets of DV files to my extractor.
I think it should be reliable enough to add support for that in FFmpeg or at least MPlayer.
It searches for the bytes
1f 07 00 3f
or
1f 07 00 bf
then skips the next four bytes and checks that the next 8 bytes are all ff.
Sent a patch to ffmpeg-devel, with that it should work in MPlayer.
DV (former DVC) is developed by Matsushita (aka Panasonic) and Japan Victor.
Matsushita developed derivation DV formats, DVCPRO Family.
It’s included DVCPRO, DVCPRO50, DVCPRO HD, DVCPRO HD-LP, DVCPRO HD EX, DVCPRO50 P (Progressive) and DVCHD formats.
Sony developed DV-based format named DVCAM.
AVCHD is developed by Matsushita (aka Panasonic) and Sony.
I don’t know what but there are also “DV-LP”, “DV-SP” and “HDV1080i” format.
NIGHTMARE!!
with mplayer, assuming the file plays, it would be as easy as putting vf=screenshot,yadif into the config and hitting the D and s keys for deint/screenshot respectfully.
you forgot the ‘most fun’ way to create screenshots!
start the game up in a sega saturn emulator and use its screenshot function :)
second fun way: use your sega saturn connected to tv-input card and then screenshot with any capture card software.
thats quite an impressive number of tests you undertook to do this ‘simple’ task.
FYI, you can change QuickTime Player Pro to display DV at 720×480 – choose Window | Show Movie Properties, select the movie itself in the track listing, click the Presentation tab, change “Conform aperture to:” to “Encoded Pixels” instead of the default “Clean”.
@Robert: Thanks for the tip on the even more advanced screenshot Easter egg in Mac OS X. The references I found didn’t mention that variation. Unfortunately, if I can’t find a player that can play DV like I want, it doesn’t do me much good.
@Reimar: I saw the patch; nice work. For the record, though, all of my samples were (AFAIK) properly formed (I didn’t conduct my initial round of tests on that contrived 40 MB sample). MPlayer played one sample but not the other. We’ll see if the patch fixes my larger samples.
@compn: Thanks for the extra option. If I can rely on MPlayer to play back more of these files correctly, that might be my ultimate solution. As for emulation, I hear that Saturn emulators exist but haven’t investigated their quality. Plus, I still have a Saturn console that usually works (though it seems to require a warm-up period to be really reliable). Plus, I enjoy the model of playing a game for 1/2-2 hours and not having to worry about screenshots until later.
Also, I have a long history with this game capture stuff and have traditionally used ATI TV capture cards for this same task. Those would usually capture to MPEG files that suffered from similar problems, though I didn’t usually have trouble to this extent.
Additionally, I have several more consoles that I need to capture from, some that are obscure enough to not have emulators (yet).
@Andrew: Wow, that might be the most compelling feature I have ever heard about from the full version of QT Player Pro.
It sounds like Adobe Media Encoder can do what you need, but the steps to save a screenshot make it unusable. If those screenshot steps could be automated, would it be a workable solution? I know Windows has programs such as Autohotkey and AutoIt to automate graphical clients. I’m not aware of any similar software for Mac.