I’m finally completing something I set out to comprehend over a decade ago. I wanted to understand how data is actually laid out on a Sega Dreamcast GD-ROM drive. I’m trying to remember why I even still care. There was something about how I wanted to make sure the contents of a set of Dreamcast demo discs was archived for study.
I eventually figured it out. Read on, if you are interested in the technical details. Or, if you would like to examine the fruits of this effort, check out the Dreamcast demo discs that I took apart and uploaded to the Internet Archive.
If you care to read some geeky technical details of some of the artifacts on these sampler discs, check out this followup post on Dreamcast Finds.
Motivation
Why do I still care about this? Well, see the original charter of this blog above. It’s mostly about studying multimedia formats, as well as the general operation of games and their non-multimedia data formats. It’s also something that has nagged at me ever since I extracted a bunch of Dreamcast discs years ago and tried to understand why the tracks were arranged the way they were, and how I could systematically split the files out of the filesystem. This turns out not to be as easy as it might sound, even if you can get past the obstacle of getting at the raw data.
CD/CD-ROM Refresher
As I laid out in my Grand Unified Theory of Compact Disc, every compact disc can be viewed conceptually as a string of sectors, where each sector is 2352 bytes long. The difference among the various CD types (audio CDs, various CD-ROM types) boils down to the format of contents of the 2352-byte sectors. For an audio CD, every sector’s 2352 bytes represents 1/75 of a second of CD-quality audio samples.
Meanwhile, there are various sector layouts for different CD-ROM modes, useful for storing computer data. This post is most interested in “mode 1/form 1”, which uses 2048 of the 2352 bytes for data, while using the remaining bytes for error detection and correction codes. A filesystem (usually ISO-9660) is overlaid on these 2048-byte sectors in order to create data structures for organizing strings of sectors into files.
A CD has between 1 and 99 tracks. A pure CD-ROM will have a single data track. Pure audio CDs tend to have numerous audio tracks, usually 1 per song. Mixed CDs are common. For software, this usually manifests as the first track being data and containing an ISO-9660 filesystem, followed by a series of audio tracks, sometimes for in-game music. For audio CDs, there is occasionally a data track at the end of the disc with some extra media types.
GD-ROM Refresher
The Dreamcast used optical discs called GD-ROMs, where the GD stands for “gigadisc”. These discs were designed to hold about 1 gigabyte of data, vs. the usual 650-700MB offered by standard CD solutions, while using the same laser unit as is used for CDs. I’m not sure how it achieved this exactly. I always assumed it was some sort of “double density” sector scheme. According to Wikipedia, the drive read the disc at a slower rate which allowed it to read more data (presumably the “pits” vs. “lands” which comprise the surface of an optical disc). This might be equivalent to my theory.
The GD-ROM discs cannot be read in a standard optical drive. It is necessary to get custom software onto the Dreamcast which will ask the optical hardware to extract the sectors and exfiltrate them off of the unit somehow. There are numerous methods for this. Alternatively, just find rips that are increasingly plentiful around the internet. However, just because you might be able to find the data for a given disc does not mean that you can easily explore the contents.
Typical Layout Patterns
Going back to my study of the GD-ROM track layouts, 2 clear patterns emerge:
All of the game data is packed into track 3:
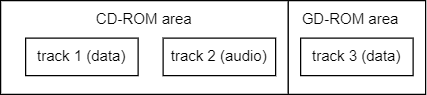
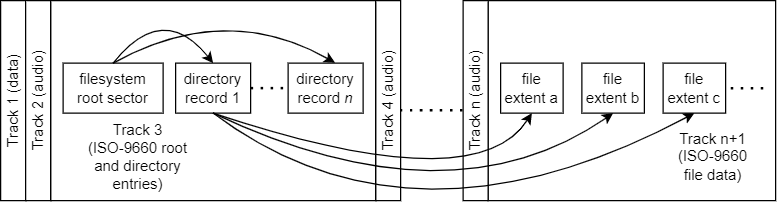
Track 3 has data, the last track has data, and the tracks in between contain standard CD audio:

Also, the disc is always, always 100% utilized.
Track 1 always contains an ISO-9660 filesystem and can be read by any standard CD-ROM drive. And it usually has nothing interesting. Track 3 also contains what appears to be an ISO-9660 filesystem. However, if you have a rip of the track and try to mount the image with standard tools, it will not work. In the second layout, the data follows no obvious format.
Cracking The Filesystem Code
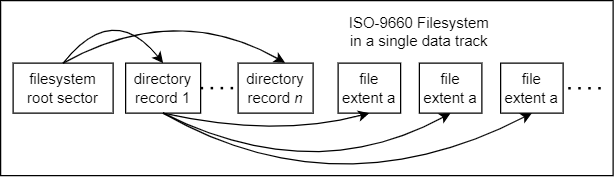
I figured out quite a few years ago that in the case of the consolidated data track 3, that’s simply a standard ISO-9660 filesystem that would work fine with standard ISO-9660 reading software… if the data track were located beginning at sector 45000. The filesystem data structures contain references to absolute sector numbers. Thus, if it were possible to modify some ISO-9660 software to assume the first sector is 45000, it ought to have no trouble interpreting the data.
How about the split data track format? Actually, it works the same way. If all the data were sitting on its original disc, track 3 would have data structures pointing to strings of contiguous sectors (extents) in the final track, and those are the files.
To express more succinctly: track 3 contains the filesystem root structure and the directory structures, while the final track contains the actual file data. How is the filesystem always 100% full? Track 3 gets padded out with 0-sectors until the beginning of any audio sectors.
Why Lay Things Out Like This?
Why push the data as far out on the disc as possible? A reasonable explanation for this would be for read performance. Compact discs operate on Constant Linear Velocity (CLV), vs. Constant Angular Velocity (CAV). The implication of this is that data on the outside of the disc is read faster than data on the inside. I once profiled this characteristic in order to prove it to myself, using both PC CD drives as well as a Dreamcast. By pushing the data to the outer sectors, graphical data gets loaded into RAM faster, and full motion videos, which require a certain minimum bitrate for a good experience, have a better guarantee that playback will be smooth.
Implications For Repacking
Once people figured out how to boot burned CDs in the Dreamcast, they had a new problem: Squeeze as much as 1 gigabyte down to around 650 megabytes at the most. It looks like the most straightforward strategy was to simply rework the filesystem to remove the often enormous amount of empty space in track 3.
My understanding is that another major strategy is to re-encode certain large assets. Full motion video (FMV) assets are a good target here since the prevailing FMV middleware format used on Sega Dreamcast games was Sofdec, which is basically just MPEG-1 video. There is ample opportunity to transcode these files to lower bitrate settings to squeeze some bits (and a lot of visual quality) out of them.
Further, if you don’t really care about the audio tracks, you could just replace them with brief spurts of silence.
Making A Tool
So I could make a tool that would process these collections of files representing a disc. I could also adapt it for various forms that a Dreamcast rip might take (I have found at least 3 so far). I could eventually expand it to handle lots of other disc formats (you know, something like Aaru does these days). And that would have been my modus operandi perhaps 10 or more years ago. And of course, the ambitious tool would have never seen daylight as I got distracted by other ideas.
I wanted to get a solution up and running as quickly as possible this time. Here was my initial brainstorm: assemble all the tracks into a single, large disc while pretending the audio tracks consist of 2048-byte sectors. In doing so, I ought to be able to use fuseiso to mount the giant image, with a modification to look for the starting sector at a somewhat nonstandard location.
To achieve the first part I wrote a quick Python script that processed the contents of a GDI file, which was stored alongside the ISO (data) and RAW (audio) track track rips from when I extracted the disc. The GDI is a very matter-of-fact listing of the tracks and their properties, e.g.:
5
1 0 4 2048 track01.iso 0
2 721 0 2352 track02.raw 0
3 45000 4 2048 track03.iso 0
4 338449 0 2352 track04.raw 0
5 349096 4 2048 track05.iso 0
track number / starting sector / track type (4=data, 0=audio) / bytes per sector / filename / ??
The script skips the first 2 filenames, instead writing 45000 zero sectors in order to simulate the CD-compatible area. Then, for each file, if it’s an ISO, append the data to the final data file; if it’s audio, compute the number of sectors occupied, and then append that number of 2048-byte zero sectors to the final data file.
Finally, to interpret the filesystem, I used an old tool that I’ve relied upon for a long time– fuseiso. This is a program that leverages Filesystem in Userspace (FUSE) to mount ISO-9660 filesystems as part of the local filesystem, without needing root privileges. The original source hasn’t been updated for 15 years, but I found a repo that attempts to modernize it slightly. I forked a version which fixes a few build issues.
Anyway, I just had to update a table to ask it to start looking for the root ISO-9660 filesystem at a different location than normal. Suddenly, after so many years, I was able to freely browse a GD-ROM filesystem directly under Linux!
Conclusion And Next Steps
I had to hack the fuseiso3 tool a bit in order to make this work. I don’t think it’s especially valuable to make sure anyone can run with the same modifications since the tool assumes that a GD-ROM rip has been processed through the exact pipeline I described above.
I have uploaded all of the North American Dreamcast demo discs to archive.org. See this post for a more granular breakdown of what this entails. In the course of this exercise, I also found some European demo discs that could use the same extraction.
What else? Should I perform the same extraction experiment for all known Dreamcast games? Would anyone care? Maybe if there’s a demand for it.
Here is a followup on the interesting and weird things I have found on these discs so far.
Pingback: Archival Log: Dreamcast Demo Discs | Gaming Pathology