Author Archives: Multimedia Mike

Reverse Engineering Radius VideoVision

I was called upon to help reverse engineer an old video codec called VideoVision (FourCC: PGVV), ostensibly from a company named Radius. I’m not sure of the details exactly but I think a game developer has a bunch of original FMV data from an old game locked up in this format. The name of the codec sounded familiar. Indeed, we have had a sample in the repository since 2002. Alex B. did some wiki work on the codec some years ago. The wiki mentions that there existed a tool to transcode PGVV data into MJPEG-B data, which is already known and supported by FFmpeg.

The Software
My contacts were able to point me to some software, now safely archived in the PGVV samples directory. There is StudioPlayer2.6.2.sit.hqx which is supposed to be a QuickTime component for working with PGVV data. I can’t even remember how to deal with .sit or .hqx data. Then there is RadiusVVTranscoder101.zip which is the tool that transcodes to MJPEG-B.

Disassembling for Reverse Engineering
Since I could actually unpack the transcoder, I set my sights on that. Unpacking the archive sets up a directory structure for a component. There is a binary called RadiusVVTranscoder under RadiusVVTranscoder.component/Contents/MacOS/. Basic deadlisting disassembly is performed via ‘otool’ as shown:

  otool -tV RadiusVVTranscoder | c++filt

This results in a deadlisting of both PowerPC and 32-bit x86 code, as the binary is a “fat” Mac OS X binary designed to run on both architectures. The command line also demangles C++ function signatures which gives useful insight into the parameters passed to a function.

Pretty Pictures
The binary had a lot of descriptive symbols. As a basis for reverse engineering, I constructed call graphs using these symbols. Here are the 2 most relevant portions (click for larger images).

The codec initialization generates Huffman tables relevant to the codec:


The main decode function calls AddMJPGFrame which apparently does the heavy lifting for the transcode process:
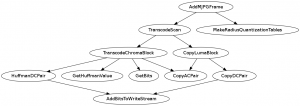


Based on this tree, I’m guessing that luma blocks can be losslessly transcoded (perhaps with different Huffman tables) which chroma blocks may rely on a different quantization method.

Assembly Constructs
I started looking at the instructions (the x86 ones, of course). The binary uses a calling convention I haven’t seen before, at least not for the x86: Rather than pushing function arguments onto the stack, the code manually subtracts, e.g., 12 from the ESP register, loads 3 32-bit arguments into memory relative to ESP, and then proceeds with the function call.

I’m also a little unclear on constructs such as “call ___i686.get_pc_thunk.bx” seen throughout relevant functions such as MakeRadiusQuantizationTables().

I’m just presenting what I have so far in case anyone else wants to try their hand.

Dreamcast Development Desktop

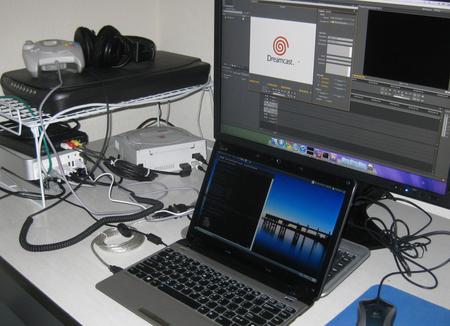
Some people are curious about what kind of equipment is required to program a Sega Dreamcast. This is my setup:


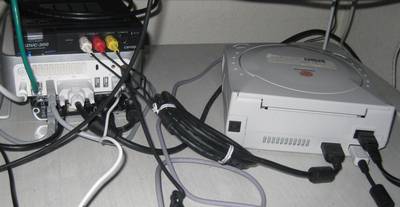
It’s a bit overcomplicated. The only piece in that picture which doesn’t play a role in the Dreamcast development process is the scanner. The Eee PC does the heavy lifting of development (i.e., text editing and cross compilation) and uploads to the Dreamcast via a special serial cable. Those are the most essential parts and are really the only pieces necessary for a lot of algorithmic stuff (things that can be validated via a serial console). But then I have to go up a level where I output video. That’s where things get messy.


The Mac Mini and giant monitor really just act as a glorified TV in this case. Ideally, it will be more than that. The DC outputs audio and video via composite cables to a Canopus DV capture bridge. That’s connected via FireWire to the external hard drive underneath the Mac Mini, which is connected to the Mac. Adobe Premiere Pro handles the DV capture / display.

One day I hope to have something worthwhile to capture.

Announcing Dreamroq

I have pushed the first public version of my new Dreamroq (we open source types are just so creative in our naming schemes) library up to Github:

https://github.com/multimediamike/dreamroq

To review, this is a library for playing RoQ video files on the Sega Dreamcast. It has a lot of problems right now, many of which are listed in the README file. It comes with a Dreamcast/KOS sample player. It also comes with a simple Unix testing utility which decodes a file to a series of PNM files. If anyone is interested in debugging RoQ again after all these years that it has been supported in other open source programs, there is still a bug in the video decoder that produces some notable artifacts.

Also, here are some samples I generated that appear to meet the data rate requirements laid out in this post. These samples are based on this sample media set from Xiph.org.

RoQ on Dreamcast

I have been working on that challenge to play back video on the Sega Dreamcast. To review, I asserted that the RoQ format would be a good fit for the Sega Dreamcast hardware. The goal was to play 640×480 video at 30 frames/second. Short version: I have determined that it is possible to decode such video in real time. However, I ran into certain data rate caveats.

First off: Have you ever wondered if the Dreamcast can read an 80mm optical disc? It can! I discovered this when I only had 60 MB of RoQ samples to burn on a disc and a spindle full of these 210MB-capacity 80mm CD-Rs that I never have occasion to use.


New RoQ Library
There are open source RoQ decoders out there but I decided to write a new one. A few reasons: 1) RoQ is so simple that I didn’t think it would take too long; 2) it would be nice to have a RoQ library that is license-compatible (BSD-like) with the rest of the KallistiOS distribution; 3) the idroq.tar.gz distribution, while license-compatible, has enough issues that I didn’t want to correct it.

Thankfully, I was correct about the task not being too difficult: I put together a new RoQ decoder in short order. I’m a bit embarrassed to admit that the part I had the most trouble with was properly converting YUV -> RGB.
Continue reading