Category Archives: VP8

Greed is Good; Greed Works

Greed, for lack of a better word, is good; Greed works. Well, most of the time. Maybe.

Picking Prediction Modes
VP8 uses one of 4 prediction modes to predict a 16×16 luma block or 8×8 chroma block before processing it (for luma, a block can also be broken into 16 4×4 blocks for individual prediction using even more modes).

So, how to pick the best predictor mode? I had no idea when I started writing my VP8 encoder. I did not read any literature on the matter; I just sat down and thought of a brute-force approach. According to the comments in my code:

// naive, greedy algorithm:
//   residual = source - predictor
//   mean = mean(residual)
//   residual -= mean
//   find the max diff between the mean and the residual
// the thinking is that, post-prediction, the best block will
// be comprised of similar samples

After removing the predictor from the macroblock, individual 4×4 subblocks are put through a forward DCT and quantized. Optimal compression in this scenario results when all samples are the same since only the DC coefficient will be non-zero. Failing that, when the input samples are at least similar to each other, few of the AC coefficients will be non-zero, which helps compression. When the samples are all over the scale, there aren’t a whole lot of non-zero coefficients unless you crank up the quantizer, which results in poor quality in the reconstructed subblocks.

Thus, my goal was to pick a prediction mode that, when applied to the input block, resulted in a residual in which each element would feature the least deviation from the mean of the residual (relative to other prediction choices).

Greedy Approach
I realized that this algorithm falls into the broad general category of “greedy” algorithms— one that makes locally optimal decisions at each stage. There are most likely smarter algorithms. But this one was good enough for making an encoder that just barely works.

Compression Results
I checked the total file compression size on my usual 640×360 Big Buck Bunny logo image while forcing prediction modes vs. using my greedy prediction picking algorithm. In this very simple test, DC-only actually resulted in slightly better compression than the greedy algorithm (which says nothing about overall quality).

prediction mode quantizer index = 0 (minimum) quantizer index = 10
greedy 286260 98028
DC 280593 95378
vertical 297206 105316
horizontal 295357 104185
TrueMotion 311660 113480

As another data point, in both quantizer cases, my greedy algorithm selected a healthy mix of prediction modes:

  • quantizer index 0: DC = 521, VERT = 151, HORIZ = 183, TM = 65
  • quantizer index 10: DC = 486, VERT = 167, HORIZ = 190, TM = 77

Size vs. Quality
Again, note that this ad-hoc test only measures one property (a highly objective one)– compression size. It did not account for quality which is a far more controversial topic that I have yet to wade into.

The Big VP8 Debug

I hope my previous walkthrough of the VP8 4×4 intra coding process was educational. Today, I’ll be walking through an example of what happens when my toy VP8 encoder encodes an intra 16×16 block. This may prove educational to those who have never been exposed to the deep details of this or related algorithms. Also, I wanted to illustrate where I think my VP8 encoder process is going bad and generating such grotesque results.

Before I start, let me give a shout-out to Google Docs’ Drawing tool which I used to generate these diagrams. It works quite well.

Results

(Always cut to the chase in a blog post; results first.) I’m glad I composed this post. In the course of doing so, I found the problem, fixed it, and am now able to present this image that was decoded from the bitstream encoded by my toy working VP8 encoder:


Yeah, I know that image doesn’t look like anything you haven’t seen before. The difference is that it has made a successful trip through my VP8 encoder.

Follow along through the encoding process and learn of the mistake…

Original Block and Subblocks

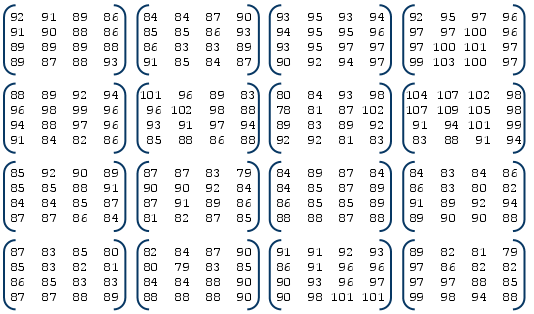
Here is the 16×16 block to be encoded:


The block is broken down into 16 4×4 subblocks for further encoding:


Prediction
Continue reading

Tour of Part of the VP8 Process

My toy VP8 encoder outputs a lot of textual data to illustrate exactly what it’s doing. For those who may not be exactly clear on how this or related algorithms operate, this may prove illuminating.

Let’s look at subblock 0 of macroblock 0 of a luma plane:

 subblock 0 (original)
  92  91  89  86
  91  90  88  86
  89  89  89  88
  89  87  88  93

Since it’s in the top-left corner of the image to be encoded, the phantom samples above and to the left are implicitly 128 for the purpose of intra prediction (in the VP8 algorithm).

 subblock 0 (original)
     128 128 128 128
 128  92  91  89  86
 128  91  90  88  86
 128  89  89  89  88
 128  89  87  88  93

Continue reading

Minimal Understanding of VP8’s Forward Transform

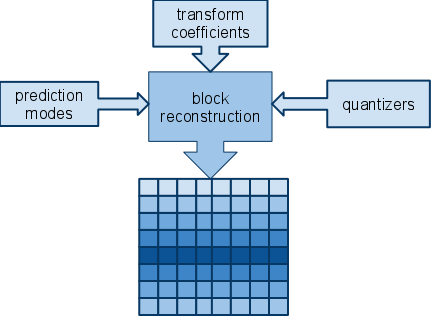
Regarding my toy VP8 encoder, Pengvado mentioned in the comments of my last post, “x264 looks perfect using only i16x16 DC mode. You must be doing something wrong in computing residual or fdct or quantization.” This makes a lot of sense. The encoder generates a series of elements which describe how to reconstruct the original image. Intra block reconstruction takes into consideration the following elements:


I have already verified that both my encoder and FFmpeg’s VP8 decoder agree precisely on how to reconstruct blocks based on the predictors, coefficients, and quantizers. Thus, if the decoded image still looks crazy, the elements the encoder is generating to describe the image must be wrong.

So I started studying the forward DCT, which I had cribbed wholesale from the original libvpx 0.9.0 source code. It should be noted that the formal VP8 spec only defines the inverse transform process, not the forward process. I was using a version designated as the “short” version, vs. the “fast” version. Then I looked at the 0.9.5 FDCT. Then I got the idea of comparing the results of each.

input: 92 91 89 86 91 90 88 86 89 89 89 88 89 87 88 93

  • libvpx 0.9.0 “short”:
    forward: -314 5 1 5 4 5 -2 0 0 1 -1 -1 1 11 -3 -4
    inverse: 92 91 89 86 89 86 91 90 91 90 88 86 88 86 89 89
    
  • libvpx 0.9.0 “fast”:
    forward: -314 4 0 5 4 4 -2 0 0 1 0 -1 1 11 -2 -5 
    inverse: 91 91 89 86 88 86 91 90 91 90 88 86 88 86 89 89 
    
  • libvpx 0.9.5 “short”:
    forward: -312 7 1 0 1 12 -5 2 2 -3 3 -1 1 0 -2 1 
    inverse: 92 91 89 86 91 90 88 86 89 89 89 88 89 87 88 93 
    

I was surprised when I noticed that input[] != idct(fdct(input[])) in some of the above cases. Then I remembered that the aforementioned property isn’t what is meant by a “bit-exact” transform– only that all implementations of the inverse transform are supposed to produce bit-exact output for a given vector of input coefficients.

Anyway, I tried applying each of these forward transforms. I got slightly differing results, with the latest one I tried (the fdct from libvpx 0.9.5) producing the best results (to my eye). At least the trees look better in the Big Buck Bunny logo image:


The dense trees of the Big Buck Bunny logo using one of the libvpx 0.9.0 forward transforms


The same segment of the image using the libvpx 0.9.5 forward transform

Then again, it could be that the different numbers generated by the newer forward transform triggered different prediction modes to be chosen. Overall, adapting the newer FDCT did not dramatically improve the encoding quality.

Working on the intra 4×4 mode encoding is generating some rather more accurate blocks than my intra 16×16 encoder. Pengvado indicated that x264 generates perfectly legible results when forcing the encoder to only use intra 16×16 mode. To be honest, I’m having trouble understanding how that can possibly occur thanks to the Walsh-Hadamard transform (WHT). I think that’s where a lot of the error is creeping in with my intra 16×16 encoder. Then again, FFmpeg implements an inverse WHT function that bears ‘vp8’ in its name. This implies that it’s custom to the algorithm and not exactly shared with H.264.